A Sense of Doubt blog post #1309 - Advanced Git Tips for Developers - via REAL PYTHON
Coming down off Grading Hell and getting ready for the second half-marathon of Grading Hell.
This article has been in my open tabs for about a month.
Remember, it's my DAMN STUDY, not so much my teaching.
I haven't even finished reading this one, so it's like a big BOOKMARK, but we have CODE AND LEARN Wednesday, so here you go peeps.
FROM -
https://realpython.com/advanced-git-for-pythonistas/
Advanced Git Tips for Python Developers
by Jim Anderson Aug 13, 2018
If you’ve done a little work in Git and are starting to understand the basics we covered in our introduction to Git, but you want to learn to be more efficient and have more control, then this is the place for you!
In this tutorial, we’ll talk about how to address specific commits and entire ranges of commits, using the stash to save temporary work, comparing different commits, changing history, and how to clean up the mess if something doesn’t work out.
This article assumes you’ve worked through our first Git tutorial or at a minimum understand the basics of what Git is and how it works.
There’s a lot of ground to cover, so let’s get going.
Revision Selection
There are several options to tell Git which revision (or commit) you want to use. We’ve already seen that we can use a full SHA (
25b09b9ccfe9110aed2d09444f1b50fa2b4c979c) and a short SHA (25b09b9cc) to indicate a revision.
We’ve also seen how you can use
HEAD or a branch name to specify a particular commit as well. There are a few other tricks that Git has up its sleeve, however.Relative Referencing
Sometimes it’s useful to be able to indicate a revision relative to a known position, like
HEADor a branch name. Git provides two operators that, while similar, behave slightly differently.
The first of these is the tilde (
~) operator. Git uses tilde to point to a parent of a commit, so HEAD~ indicates the revision before the last one committed. To move back further, you use a number after the tilde: HEAD~3 takes you back three levels.
This works great until we run into merges. Merge commits have two parents, so the
~ just selects the first one. While that works sometimes, there are times when you want to specify the second or later parent. That’s why Git has the caret (^) operator.
The
^ operator moves to a specific parent of the specified revision. You use a number to indicate which parent. So HEAD^2 tells Git to select the second parent of the last one committed, not the “grandparent.” It can be repeated to move back further: HEAD^2^^ takes you back three levels, selecting the second parent on the first step. If you don’t give a number, Git assumes 1.
Note: Those of you using Windows will need to escape the
^ character on the DOS command line by using a second ^.
To make life even more fun and less readable, I’ll admit, Git allows you to combine these methods, so
25b09b9cc^2~3^3 is a valid way to indicate a revision if you’re walking back a tree structure with merges. It takes you to the second parent, then back three revisions from that, and then to the third parent.Revision Ranges
There are a couple of different ways to specify ranges of commits for commands like
git log. These don’t work exactly like slices in Python, however, so be careful!
Double Dot Notation
The “double dot” method for specifying ranges looks like it sounds:
git log b05022238cdf08..60f89368787f0e. It’s tempting to think of this as saying “show me all commits after b05022238cdf08 up to and including 60f89368787f0e” and, if b05022238cdf08 is a direct ancestor of 60f89368787f0e, that’s exactly what it does.
Note: For the rest of this section, I will be replacing the SHAs of individual commits with capital letters as I think that makes the diagrams a little easier to follow. We’ll use this “fake” notation later as well.
It’s a bit more powerful than that, however. The double dot notation actually is showing you all commits that are included in the second commit that are not included in the first commit. Let’s look at a few diagrams to clarify:
As you can see, we have two branches in our example repo,
branch1 and branch2, which diverged after commit A. For starters, let’s look at the simple situation. I’ve modified the log output so that it matches the diagram:$ git log --oneline D..F
E "Commit message for E"
F "Commit message for F"
D..F gives you all of the commits on branch2 after commit D.
A more interesting example, and one I learned about while writing this tutorial, is the following:
$ git log --oneline C..F
D "Commit message for D"
E "Commit message for E"
F "Commit message for F"
This shows the commits that are part of commit
F that are not part of commit C. Because of the structure here, there is not a before/after relationship to these commits because they are on different branches.
Triple Dot
Triple dot notation uses, you guessed it, three dots between the revision specifiers. This works in a similar manner to the double dot notation except that it shows all commits that are in either revision that are not included in both revisions. For our diagram above, using
C...F shows you this:$ git log --oneline C...F
D "Commit message for D"
E "Commit message for E"
F "Commit message for F"
B "Commit message for B"
C "Commit message for C"
Double and triple dot notation can be quite powerful when you want to use a range of commits for a command, but they’re not as straightforward as many people think.
Branches vs. HEAD vs. SHA
This is probably a good time to review what branches are in Git and how they relate to SHAs and HEAD.
HEAD is the name Git uses to refer to “where your file system is pointing right now.” Most of the time, this will be pointing to a named branch, but it does not have to be. To look at these ideas, let’s walk through an example. Suppose your history looks like this:
At this point, you discover that you accidentally committed a Python logging statement in commit B. Rats. Now, most people would add a new commit,
E, push that to master and be done. But you are learning Git and want to fix this the hard way and hide the fact that you made a mistake in the history.
So you move
HEAD back to B using git checkout B, which looks like this:
You can see that
master hasn’t changed position, but HEAD now points to B. In the Intro to Git tutorial, we talked about the “detached HEAD” state. This is that state again!
Since you want to commit changes, you create a new branch with
git checkout -b temp:
Now you edit the file and remove the offending log statement. Once that is done, you use
git add and git commit --amend to modify commit B:
Whoa! There’s a new commit here called
B'. Just like B, it has A as its parent, but C doesn’t know anything about it. Now we want master to be based on this new commit, B'.
Because you have a sharp memory, you remember that the rebase command does just that. So you get back to the
master branch by typing git checkout master:
Once you’re on master, you can use
git rebase temp to replay C and D on top of B: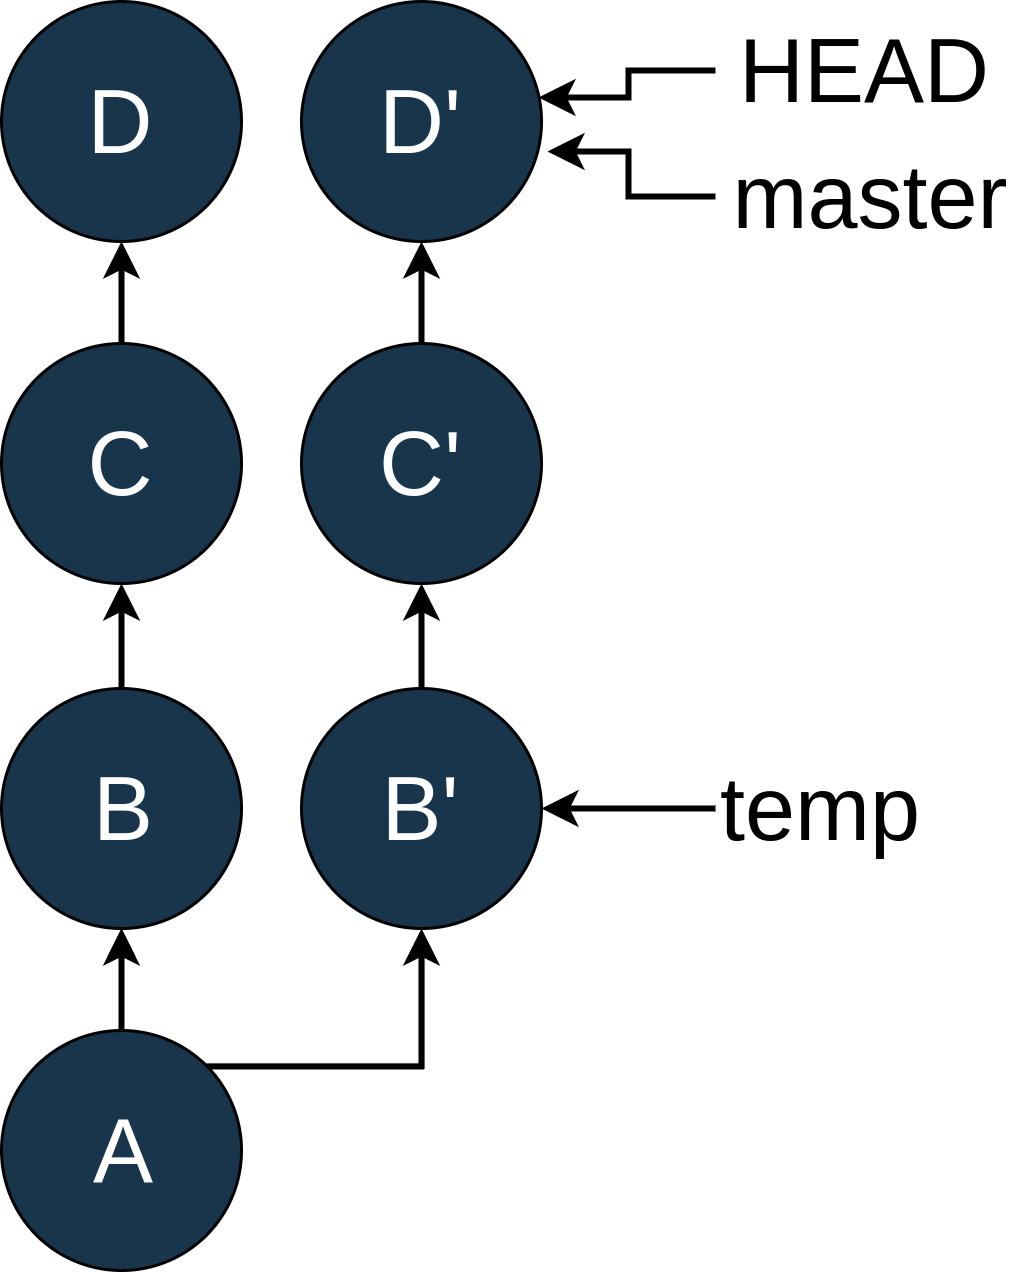
You can see that the rebase created commits
C' and D'. C' still has the same changes that Chas, and D' has the same changes as D, but they have different SHAs because they are now based on B' instead of B.
As I mentioned earlier, you normally wouldn’t go to this much trouble just to fix an errant log statement, but there are times when this approach could be useful, and it does illustrate the differences between
HEAD, commits, and branches.
More
Git has even more tricks up its sleeve, but I’ll stop here as I’ve rarely seen the other methods used in the wild. If you’d like to learn about how to do similar operations with more than two branches, checkout the excellent write-up on Revision Selection in the Pro Git book.
Handling Interruptions: git stash
One of the Git features I use frequently and find quite handy is the
stash. It provides a simple mechanism to save the files you’re working on but are not ready to commit so you can switch to a different task. In this section, you’ll walk through a simple use case first, looking at each of the different commands and options, then you will wrap up with a few other use cases in which git stash really shines.
git stash save and git stash pop
Suppose you’re working on a nasty bug. You’ve got Python logging code in two files,
file1and file2, to help you track it down, and you’ve added file3 as a possible solution.
In short, the changes to the repo are as follows:
- You’ve edited
file1and donegit add file1. - You’ve edited
file2but have not added it. - You’ve created
file3and have not added it.
You do a
git status to confirm the condition of the repo:$ git status
On branch master
Changes to be committed:
(use "git reset HEAD ..." to unstage)
modified: file1
Changes not staged for commit:
(use "git add ..." to update what will be committed)
(use "git checkout -- ..." to discard changes in working directory)
modified: file2
Untracked files:
(use "git add ..." to include in what will be committed)
file3
Now a coworker (aren’t they annoying?) walks up and tells you that production is down and it’s “your turn.” You know you can break out your mad
git stash skills to save you some time and save the day.
You haven’t finished with the work on files 1, 2, and 3, so you really don’t want to commit those changes but you need to get them off of your working directory so you can switch to a different branch to fix that bug. This is the most basic use case for
git stash.
You can use
git stash save to “put those changes away” for a little while and return to a clean working directory. The default option for stash is save so this is usually written as just git stash.
When you save something to
stash, it creates a unique storage spot for those changes and returns your working directory to the state of the last commit. It tells you what it did with a cryptic message:$ git stash save
Saved working directory and index state WIP on master: 387dcfc adding some files
HEAD is now at 387dcfc adding some files
In that output,
master is the name of the branch, 387dcfc is the SHA of the last commit, adding some files is the commit message for that commit, and WIP stands for “work in progress.” The output on your repo will likely be different in those details.
If you do a
status at this point, it will still show file3 as an untracked file, but file1 and file2 are no longer there:$ git status
On branch master
Untracked files:
(use "git add ..." to include in what will be committed)
file3
nothing added to commit but untracked files present (use "git add" to track)
At this point, as far as Git is concerned, your working directory is “clean,” and you are free to do things like check out a different branch, cherry-pick changes, or anything else you need to.
You go and check out the other branch, fix the bug, earn the admiration of your coworkers, and now are ready to return to this work.
How do you get the last stash back?
git stash pop!
Using the
pop command at this point looks like this:$ git stash pop
On branch master
Changes not staged for commit:
(use "git add ..." to update what will be committed)
(use "git checkout -- ..." to discard changes in working directory)
modified: file1
modified: file2
Untracked files:
(use "git add ..." to include in what will be committed)
file3
no changes added to commit (use "git add" and/or "git commit -a")
Dropped refs/stash@{0} (71d0f2469db0f1eb9ee7510a9e3e9bd3c1c4211c)
Now you can see at the bottom that it has a message about “Dropped refs/stash@{0}”. We’ll talk more about that syntax below, but it’s basically saying that it applied the changes you had stashed and got rid of the stash itself. Before you ask, yes, there is a way to use the stash and not get rid of it, but let’s not get ahead of ourselves.
You’ll notice that
file1 used to be in the index but no longer is. By default, git stash popdoesn’t maintain the status of changes like that. There is an option to tell it to do so, of course. Add file1 back to the index and try again:$ git add file1
$ git status
On branch master
Changes to be committed:
  (use "git reset HEAD ..." to unstage)

   modified:   file1

Changes not staged for commit:
  (use "git add ..." to update what will be committed)
  (use "git checkout -- ..." to discard changes in working directory)

   modified:   file2

Untracked files:
  (use "git add ..." to include in what will be committed)

   file3
$ git stash save "another try"
Saved working directory and index state On master: another try
HEAD is now at 387dcfc adding some files
$ git stash pop --index
On branch master
Changes to be committed:
(use "git reset HEAD ..." to unstage)
modified: file1
Changes not staged for commit:
(use "git add ..." to update what will be committed)
(use "git checkout -- ..." to discard changes in working directory)
modified: file2
Untracked files:
(use "git add ..." to include in what will be committed)
file3
Dropped refs/stash@{0} (aed3a02aeb876c1137dd8bab753636a294a3cc43)
You can see that the second time we added the
--index option to the git pop command, which tells it to try to maintain the status of whether or not a file is in the index.
In the previous two attempts, you probably noticed that
file3 was not included in your stash. You might want to keep file3 together with those other changes. Fortunately, there is an option to help you with that: --include-untracked.
Assuming we’re back to where we were at the end of the last example, we can re-run the command:
$ git stash save --include-untracked "third attempt"
Saved working directory and index state On master: third attempt
HEAD is now at 387dcfc adding some files
$ git status
On branch master
nothing to commit, working directory clean
This put the untracked
file3 into the stash with our other changes.
Before we move on, I just want to point out that
save is the default option for git stash. Unless you’re specifying a message, which we’ll discuss later, you can simply use git stash, and it will do a save.
git stash list
One of the powerful features of
git stash is that you can have more than one of them. Git stores stashes in a stack, which means that by default it always works with the most recently saved stash. The git stash list command will show you the stack of stashes in your local repo. Let’s create a couple of stashes so we can see how this works:$ echo "editing file1" >> file1
$ git stash save "the first save"
Saved working directory and index state On master: the first save
HEAD is now at b3e9b4d adding file3
$ # you can see that stash save cleaned up our working directory
$ # now create a few more stashes by "editing" files and saving them
$ echo "editing file2" >> file2
$ git stash save "the second save"
Saved working directory and index state On master: the second save
HEAD is now at b3e9b4d adding file3
$ echo "editing file3" >> file3
$ git stash save "the third save"
Saved working directory and index state On master: the third save
HEAD is now at b3e9b4d adding file3
$ git status
On branch master
nothing to commit, working directory clean
You now have three different stashes saved. Fortunately, Git has a system for dealing with stashes that makes this easy to deal with. The first step of the system is the
git stash listcommand:$ git stash list
stash@{0}: On master: the third save
stash@{1}: On master: the second save
stash@{2}: On master: the first save
List shows you the stack of stashes you have in this repo, the newest one first. Notice the
stash@{n} syntax at the start of each entry? That’s the name of that stash. The rest of the git stash subcommand will use that name to refer to a specific stash. Generally if you don’t give a name, it always assumes you mean the most recent stash, stash@{0}. You’ll see more of this in a bit.
Another thing I’d like to point out here is that you can see the message we used when we did the
git stash save "message" command in the listing. This can be quite helpful if you have a number of things stashed.
As we mentioned above, the
save [name] portion of the git stash save [name] command is not required. You can simply type git stash, and it defaults to a save command, but the auto-generated message doesn’t give you much information:$ echo "more editing file1" >> file1
$ git stash
Saved working directory and index state WIP on master: 387dcfc adding some files
HEAD is now at 387dcfc adding some files
$ git stash list
stash@{0}: WIP on master: 387dcfc adding some files
stash@{1}: On master: the third save
stash@{2}: On master: the second save
stash@{3}: On master: the first save
The default message is
WIP on : . , which doesn’t tell you much. If we had done that for the first three stashes, they all would have had the same message. That’s why, for the examples here, I use the full git stash save syntax.
git stash show
Okay, so now you have a bunch of stashes, and you might even have meaningful messages describing them, but what if you want to see exactly what’s in a particular stash? That’s where the
git stash show command comes in. Using the default options tells you how many files have changed, as well as which files have changed:$ git stash show stash@{2}
file1 | 1 +
1 file changed, 1 insertion(+)
The default options do not tell you what the changes were, however. Fortunately, you can add the
-p/--patch option, and it will show you the diffs in “patch” format:$ git stash show -p stash@{2}
diff --git a/file1 b/file1
index e212970..04dbd7b 100644
--- a/file1
+++ b/file1
@@ -1 +1,2 @@
file1
+editing file1
Here it shows you that the line “editing file1” was added to
file1. If you’re not familiar with the patch format for displaying diffs, don’t worry. When you get to the git difftool section below, you’ll see how to bring up a visual diff tool on a stash.
git stash pop vs. git stash apply
You saw earlier how to pop the most recent stash back into your working directory by using the
git stash pop command. You probably guessed that the stash name syntax we saw earlier also applies to the pop command:$ git stash list
stash@{0}: On master: the third save
stash@{1}: On master: the second save
stash@{2}: On master: the first save
$ git stash pop stash@{1}
On branch master
Changes not staged for commit:
(use "git add ..." to update what will be committed)
(use "git checkout -- ..." to discard changes in working directory)
while read line; do echo -n "$line" | wc -c; done<
modified: file2
no changes added to commit (use "git add" and/or "git commit -a")
Dropped stash@{1} (84f7c9890908a1a1bf3c35acfe36a6ecd1f30a2c)
$ git stash list
stash@{0}: On master: the third save
stash@{1}: On master: the first save
You can see that the
git stash pop stash@{1} put “the second save” back into our working directory and collapsed our stack so that only the first and third stashes are there. Notice how “the first save” changed from stash@{2} to stash@{1} after the pop.
It’s also possible to put a stash onto your working directory but leave it in the stack as well. This is done with
git stash apply:$ git stash list
stash@{0}: On master: the third save
stash@{1}: On master: the first save
$ git stash apply stash@{1}
On branch master
Changes not staged for commit:
(use "git add ..." to update what will be committed)
(use "git checkout -- ..." to discard changes in working directory)
modified: file1
modified: file2
no changes added to commit (use "git add" and/or "git commit -a")
$ git stash list
stash@{0}: On master: the third save
stash@{1}: On master: the first save
This can be handy if you want to apply the same set of changes multiple times. I recently used this while working on prototype hardware. There were changes needed to get the code to work on the particular hardware on my desk, but none of the others. I used
git stash apply to apply these changes each time I brought down a new copy of master.
git stash drop
The last stash subcommand to look at is
drop. This is useful when you want to throw away a stash and not apply it to your working directory. It looks like this:$ git status
On branch master
nothing to commit, working directory clean
$ git stash list
stash@{0}: On master: the third save
stash@{1}: On master: the first save
$ git stash drop stash@{1}
Dropped stash@{1} (9aaa9996bd6aa363e7be723b4712afaae4fc3235)
$ git stash drop
Dropped refs/stash@{0} (194f99db7a8fcc547fdd6d9f5fbffe8b896e2267)
$ git stash list
$ git status
On branch master
nothing to commit, working directory clean
This dropped the last two stashes, and Git did not change your working directory. There are a couple of things to notice in the above example. First, the
drop command, like most of the other git stash commands, can use the optional stash@{n} names. If you don’t supply it, Git assumes stash@{0}.
The other interesting thing is that the output from the drop command gives you a SHA. Like other SHAs in Git, you can make use of this. If, for example, you really meant to do a
pop and not a drop on stash@{1} above, you can create a new branch with that SHA it showed you (9aaa9996):$ git branch tmp 9aaa9996
$ git status
On branch master
nothing to commit, working directory clean
$ # use git log to see commits on that branch
$ git log tmp
commit 9aaa9996bd6aa363e7be723b4712afaae4fc3235
Merge: b3e9b4d f2d6ecc
Author: Jim Anderson
Once you have that branch, you can use the
git merge or other techniques to get those changes back to your branch. If you didn’t save the SHA from the git drop command, there are other methods to attempt to recover the changes, but they can get complicated. You can read more about it here.
git stash Example: Pulling Into a Dirty Tree
Let’s wrap up this section on
git stash by looking at one of its uses that wasn’t obvious to me at first. Frequently when you’re working on a shared branch for a longer period of time, another developer will push changes to the branch that you want to get to your local repo. You’ll remember that we use the git pull command to do this. However, if you have local changes in files that the pull will modify, Git refuses with an error message explaining what went wrong:error: Your local changes to the following files would be overwritten by merge:
Please, commit your changes or stash them before you can merge.
Aborting
You could commit this and then do a
pull , but that would create a merge node, and you might not be ready to commit those files. Now that you know git stash, you can use it instead:$ git stash
Saved working directory and index state WIP on master: b25fe34 Cleaned up when no TOKEN is present. Added ignored tasks
HEAD is now at
$ git pull
Updating ..
Fast-forward
It’s entirely possible that doing the
git stash pop command will produce a merge conflict. If that’s the case, you’ll need to hand-edit the conflict to resolve it, and then you can proceed. We’ll discuss resolving merge conflicts below.
Comparing Revisions: git diff
The
git diff command is a powerful feature that you’ll find yourself using quite frequently. I looked up the list of things it can compare and was surprised by the list. Try typing git diff --help if you’d like to see for yourself. I won’t cover all of those use cases here, as many of them aren’t too common.
This section has several use cases with the
diff command, which displays on the command line. The next section shows how you can set Git up to use a visual diff tool like Meld, Windiff, BeyondCompare, or even extensions in your IDE. The options for diff and difftool are the same, so most of the discussion in this section will apply there too, but it’s easier to show the output on the command line version.
The most common use of
git diff is to see what you have modified in your working directory:$ echo "I'm editing file3 now" >> file3
$ git diff
diff --git a/file3 b/file3
index faf2282..c5dd702 100644
--- a/file3
+++ b/file3
@@ -1,3 +1,4 @@
{other contents of files3}
+I'm editing file3 now
As you can see,
diff shows you the diffs in a “patch” format right on the command line. Once you work through the format, you can see that the + characters indicate that a line has been added to the file, and, as you’d expect, the line I'm editing file3 now was added to file3.
The default options for
git diff are to show you what changes are in your working directory that are not in your index or in HEAD. If you add the above change to the index and then do diff, it shows that there are no diffs:$ git add file3
$ git diff
[no output here]
I found this confusing for a while, but I’ve grown to like it. To see the changes that are in the index and staged for the next commit, use the
--staged option:$ git diff --staged
diff --git a/file3 b/file3
index faf2282..c5dd702 100644
--- a/file3
+++ b/file3
@@ -1,3 +1,4 @@
file1
file2
file3
+I'm editing file3 now
The
git diff command can also be used to compare any two commits in your repo. This can show you the changes between two SHAs:$ git diff b3e9b4d 387dcfc
diff --git a/file3 b/file3
deleted file mode 100644
index faf2282..0000000
--- a/file3
+++ /dev/null
@@ -1,3 +0,0 @@
-file1
-file2
-file3
You can also use branch names to see the full set of changes between one branch and another:
$ git diff master tmp
diff --git a/file1 b/file1
index e212970..04dbd7b 100644
--- a/file1
+++ b/file1
@@ -1 +1,2 @@
 file1
+editing file1
You can even use any mix of the revision naming methods we looked at above:
$ git diff master^ master
diff --git a/file3 b/file3
new file mode 100644
index 0000000..faf2282
--- /dev/null
+++ b/file3
@@ -0,0 +1,3 @@
+file1
+file2
+file3
When you compare two branches, it shows you all of the changes between two branches. Frequently, you only want to see the diffs for a single file. You can restrict the output to a file by listing the file after a
-- (two minuses) option:$ git diff HEAD~3 HEAD
diff --git a/file1 b/file1
index e212970..04dbd7b 100644
--- a/file1
+++ b/file1
@@ -1 +1,2 @@
file1
+editing file1
diff --git a/file2 b/file2
index 89361a0..91c5d97 100644
--- a/file2
+++ b/file2
@@ -1,2 +1,3 @@
file1
file2
+editing file2
diff --git a/file3 b/file3
index faf2282..c5dd702 100644
--- a/file3
+++ b/file3
@@ -1,3 +1,4 @@
file1
file2
file3
+I'm editing file3 now
$ git diff HEAD~3 HEAD -- file3
diff --git a/file3 b/file3
index faf2282..c5dd702 100644
--- a/file3
+++ b/file3
@@ -1,3 +1,4 @@
file1
file2
file3
+I'm editing file3 now
There are many, many options for
git diff, and I won’t go into them all, but I do want to explore another use case, which I use frequently, showing the files that were changed in a commit.
In your current repo, the most recent commit on
master added a line of text to file1. You can see that by comparing HEAD with HEAD^:$ git diff HEAD^ HEAD
diff --git a/file1 b/file1
index e212970..04dbd7b 100644
--- a/file1
+++ b/file1
@@ -1 +1,2 @@
file1
+editing file1
That’s fine for this small example, but frequently the diffs for a commit can be several pages long, and it can get quite difficult to pull out the filenames. Of course, Git has an option to help with that:
$ git diff HEAD^ HEAD --name-only
file1
The
--name-only option will show you the list of filename that were changed between two commits, but not what changed in those files.
As I said above, there are many options and use cases covered by the
git diff command, and you’ve just scratched the surface here. Once you have the commands listed above figured out, I encourage you to look at git diff --help and see what other tricks you can find. I definitely learned new things preparing this tutorial!
git difftool
Git has a mechanism to use a visual diff tool to show diffs instead of just using the command line format we’ve seen thus far. All of the options and features you looked at with
git diffstill work here, but it will show the diffs in a separate window, which many people, myself included, find easier to read. For this example, I’m going to use meld as the diff tool because it’s available on Windows, Mac, and Linux.
Difftool is something that is much easier to use if you set it up properly. Git has a set of config options that control the defaults for
difftool. You can set these from the shell using the git config command:$ git config --global diff.tool meld
$ git config --global difftool.prompt false
The
prompt option is one I find important. If you do not specify this, Git will prompt you before it launches the external build tool every time it starts. This can be quite annoying as it does it for every file in a diff, one at a time:$ git difftool HEAD^ HEAD
Viewing (1/1): 'python-git-intro/new_section.md'
Launch 'meld' [Y/n]: y
Setting
prompt to false forces Git to launch the tool without asking, speeding up your process and making you that much better!
In the
diff discussion above, you covered most of the features of difftool, but I wanted to add one thing I learned while researching for this article. Do you remember above when you were looking at the git stash show command? I mentioned that there was a way to see what is in a given stash visually, and difftool is that way. All of the syntax we learned for addressing stashes works with difftool:$ git difftool stash@{1}
As with all
stash subcommands, if you just want to see the latest stash, you can use the stash shortcut:$ git difftool stash
Many IDEs and editors have tools that can help with viewing diffs. There is a list of editor-specific tutorials at the end of the Introduction to Git tutorial.
Changing History
One feature of Git that frightens some people is that it has the ability to change commits. While I can understand their concern, this is part of the tool, and, like any powerful tool, you can cause trouble if you use it unwisely.
We’ll talk about several ways to modify commits, but before we do, let’s discuss when this is appropriate. In previous sections you saw the difference between your local repo and a remote repo. Commits that you have created but have not pushed are in your local repo only. Commits that other developers have pushed but you have not pulled are in the remote repo only. Doing a
push or a pull will get these commits into both repos.
The only time you should be thinking about modifying a commit is if it exists on your local repo and not the remote. If you modify a commit that has already been pushed from the remote, you are very likely to have a difficult time pushing or pulling from that remote, and your coworkers will be unhappy with you if you succeed.
That caveat aside, let’s talk about how you can modify commits and change history!
git commit --amend
What do you do if you just made a commit but then realize that
flake8 has an error when you run it? Or you spot a typo in the commit message you just entered? Git will allow you to “amend” a commit:$ git commit -m "I am bad at spilling"
[master 63f74b7] I am bad at spilling
1 file changed, 4 insertions(+)
$ git commit --amend -m "I am bad at spelling"
[master 951bf2f] I am bad at spelling
Date: Tue May 22 20:41:27 2018 -0600
1 file changed, 4 insertions(+)
Now if you look at the log after the amend, you’ll see that there was only one commit, and it has the correct message:
$ git log
commit 951bf2f45957079f305e8a039dea1771e14b503c
Author: Jim Anderson
If you had modified and added files before the amend, those would have been included in the single commit as well. You can see that this is a handy tool for fixing mistakes. I’ll warn you again that doing a
commit --amend modifies the commit. If the original commit was pushed to a remote repo, someone else may already have based changes on it. That would be a mess, so only use this for commits that are local-only.
git rebase
A
rebase operation is similar to a merge, but it can produce a much cleaner history. When you rebase, Git will find the common ancestor between your current branch and the specified branch. It will then take all of the changes after that common ancestor from your branch and “replay” them on top of the other branch. The result will look like you did all of your changes after the other branch.
This can be a little hard to visualize, so let’s look at some actual commits. For this exercise, I’m going to use the
--oneline option on the git log command to cut down on the clutter. Let’s start with a feature branch you’ve been working on called my_feature_branch. Here’s the state of that branch: $ git log --oneline
143ae7f second feature commit
aef68dc first feature commit
2512d27 Common Ancestor Commit
You can see that the
--oneline option, as you might expect, shows just the SHA and the commit message for each commit. Your branch has two commits after the one labeled 2512d27 Common Ancestor Commit.
You need a second branch if you’re going to do a rebase and
master seems like a good choice. Here’s the current state of the master branch:$ git log --oneline master
23a558c third master commit
5ec06af second master commit
190d6af first master commit
2512d27 Common Ancestor Commit
There are three commits on
master after 2512d27 Common Ancestor Commit. While you still have my_feature_branch checked out, you can do a rebase to put the two feature commits after the three commits on master:$ git rebase master
First, rewinding head to replay your work on top of it...
Applying: first feature commit
Applying: second feature commit
$ git log --oneline
cf16517 second feature commit
69f61e9 first feature commit
23a558c third master commit
5ec06af second master commit
190d6af first master commit
2512d27 Common Ancestor Commit
There are two things to notice in this log listing:
1) As advertised, the two feature commits are after the three master commits.
2) The SHAs of those two feature commits have changed.
The SHAs are different because the repo is slightly different. The commits represent the same changes to the files, but since they were added on top of the changes already in
master, the state of the repo is different, so they have different SHAs.
If you had done a
merge instead of a rebase, there would have been a new commit with the message Merge branch 'master' into my_feature_branch, and the SHAs of the two feature commits would be unchanged. Doing a rebase avoids the extra merge commit and makes your revision history cleaner.
git pull -r
Using a rebase can be a handy tool when you’re working on a branch with a different developer, too. If there are changes on the remote, and you have local commits to the same branch, you can use the
-r option on the git pull command. Where a normal git pull does a merge to the remote branch, git pull -r will rebase your commits on top of the changes that were on the remote.
git rebase -i
The rebase command has another method of operation. There is a
-i flag you can add to the rebase command that will put it into interactive mode. While this seems confusing at first, it is an amazingly powerful feature that lets you have full control over the list of commits before you push them to a remote. Please remember the warning about not changing the history of commits that have been pushed.
These examples show a basic interactive rebase, but be aware that there are more options and more use cases. The
git rebase --help command will give you the list and actually does a good job of explaining them.
For this example, you’re going to imagine you’ve been working on your Python library, committing several times to your local repo as you implement a solution, test it, discover a problem and fix it. At the end of this process you have a chain of commits on you local repo that all are part of the new feature. Once you’ve finished the work, you look at your
git log:$ git log --oneline
8bb7af8 implemented feedback from code review
504d520 added unit test to cover new bug
56d1c23 more flake8 clean up
d9b1f9e restructuring to clean up
08dc922 another bug fix
7f82500 pylint cleanup
a113f67 found a bug fixing
3b8a6f2 First attempt at solution
af21a53 [older stuff here]
There are several commits here that don’t add value to other developers or even to you in the future. You can use
rebase -i to create a “squash commit” and put all of these into a single point in history.
To start the process, you run
git rebase -i af21a53, which will bring up an editor with a list of commits and some instructions:pick 3b8a6f2 First attempt at solution
pick a113f67 found a bug fixing
pick 7f82500 pylint cleanup
pick 08dc922 another bug fix
pick d9b1f9e restructuring to clean up
pick 56d1c23 more flake8 clean up
pick 504d520 added unit test to cover new bug
pick 8bb7af8 implemented feedback from code review
# Rebase af21a53..8bb7af8 onto af21a53 (8 command(s))
#
# Commands:
# p, pick = use commit
# r, reword = use commit, but edit the commit message
# e, edit = use commit, but stop for amending
# s, squash = use commit, but meld into previous commit
# f, fixup = like "squash", but discard this commit's log message
# x, exec = run command (the rest of the line) using shell
# d, drop = remove commit
#
# These lines can be re-ordered; they are executed from top to bottom.
#
# If you remove a line here THAT COMMIT WILL BE LOST.
#
# However, if you remove everything, the rebase will be aborted.
#
# Note that empty commits are commented out
You’ll notice that the commits are listed in reverse order, oldest first. This is the order in which Git will replay the commits on top of
af21a53. If you just save the file at this point, nothing will change. This is also true if you delete all the text and save the file.
Also, there are several lines starting with a
# reminding you how to edit this file. These comments can be removed but do not need to be.
But you want to squash all of these commits into one so that “future you” will know that this is the commit that completely added the feature. To do that, you can edit the file to look like this:
pick 3b8a6f2 First attempt at solution
squash a113f67 found a bug fixing
s 7f82500 pylint cleanup
s 08dc922 another bug fix
s d9b1f9e restructuring to clean up
s 56d1c23 more flake8 clean up
s 504d520 added unit test to cover new bug
s 8bb7af8 implemented feedback from code review
You can use either the full word for the commands, or, as you did after the first two lines, use the single character version. The example above selected to “pick” the oldest commit and the “squash” each of the subsequent commits into that one. If you save and exit the editor, Git will proceed to put all of those commits into one and then will bring up the editor again, listing all of the commit messages for the squashed commit:
# This is a combination of 8 commits.
# The first commit's message is:
Implemented feature ABC

# This is the 2nd commit message:

found a bug fixing

# This is the 3rd commit message:

pylint cleanup

# This is the 4th commit message:

another bug fix

[the rest trimmed for brevity]
By default a squash commit will have a long commit message with all of the messages from each commit. In your case it’s better to reword the first message and delete the rest. Doing that and saving the file will finish the process, and your log will now have only a single commit for this feature:
$ git log --oneline
9a325ad Implemented feature ABC
af21a53 [older stuff here]
Cool! You just hid any evidence that you had to do more than one commit to solve this issue. Good work! Be warned that deciding when to do a squash merge is frequently more difficult than the actual process. There’s a great article that does a nice job of laying out the complexities.
As you probably guessed,
git rebase -i will allow you to do far more complex operations. Let’s look at one more example.
In the course of a week, you’ve worked on three different issues, committing changes at various times for each. There’s also a commit in there that you regret and would like to pretend never happened. Here’s your starting log:
$ git log --oneline
2f0a106 feature 3 commit 3
f0e14d2 feature 2 commit 3
b2eec2c feature 1 commit 3
d6afbee really rotten, very bad commit
6219ba3 feature 3 commit 2
70e07b8 feature 2 commit 2
c08bf37 feature 1 commit 2
c9747ae feature 3 commit 1
fdf23fc feature 2 commit 1
0f05458 feature 1 commit 1
3ca2262 older stuff here
Your mission is to get this into three clean commits and remove that one bad one. You can follow the same process,
git rebase -i 3ca2262, and Git presents you with the command file:pick 0f05458 feature 1 commit 1
pick fdf23fc feature 2 commit 1
pick c9747ae feature 3 commit 1
pick c08bf37 feature 1 commit 2
pick 70e07b8 feature 2 commit 2
pick 6219ba3 feature 3 commit 2
pick d6afbee really rotten, very bad commit
pick b2eec2c feature 1 commit 3
pick f0e14d2 feature 2 commit 3
pick 2f0a106 feature 3 commit 3
Interactive rebase allows your to not only specify what to do with each commit but also lets you rearrange them. So, to get to your three commits, you edit the file to look like this:
pick 0f05458 feature 1 commit 1
s c08bf37 feature 1 commit 2
s b2eec2c feature 1 commit 3
pick fdf23fc feature 2 commit 1
s 70e07b8 feature 2 commit 2
s f0e14d2 feature 2 commit 3
pick c9747ae feature 3 commit 1
s 6219ba3 feature 3 commit 2
s 2f0a106 feature 3 commit 3
# pick d6afbee really rotten, very bad commit
The commits for each feature are grouped together with only one of them being “picked” and the rest “squashed.” Commenting out the bad commit will remove it, but you could have just as easily deleted that line from the file to the same effect.
When you save that file, you’ll get a separate editor session to create the commit message for each of the three squashed commits. If you call them
feature 1, feature 2, and feature 3, your log will now have only those three commits, one for each feature:$ git log --oneline
f700f1f feature 3
443272f feature 2
0ff80ca feature 1
3ca2262 older stuff here
Just like any rebase or merge, you might run into conflicts in this process, which you will need to resolve by editing the file, getting the changes correct,
git add-ing the file, and running git rebase --continue.
I’ll end this section by pointing out a few things about rebase:
1) Creating squash commits is a “nice to have” feature, but you can still work successfully with Git without using it.
2) Merge conflicts on large interactive rebases can be confusing. None of the individual steps are difficult, but there can be a lot of them
3) We’ve just scratched the surface on what you can do with
git rebase -i. There are more features here than most people will ever discover.
git revert vs. git reset: Cleaning Up
Unsurprisingly, Git provides you several methods for cleaning up when you’ve made a mess. These techniques depend on what state your repo is in and whether or not the mess is local to your repo or has been pushed to a remote.
Let’s start by looking at the easy case. You’ve made a commit that you don’t want, and it hasn’t been pushed to remote. Start by creating that commit so you know what you’re looking at:
$ ls >> file_i_do_not_want
$ git add file_i_do_not_want
$ git commit -m "bad commit"
[master baebe14] bad commit
 2 files changed, 31 insertions(+)
 create mode 100644 file_i_do_not_want
$ git log --oneline
baebe14 bad commit
443272f feature 2
0ff80ca feature 1
3ca2262 older stuff here
The example above created a new file,
file_i_do_not_want, and committed it to the local repo. It has not been pushed to the remote repo yet. The rest of the examples in this section will use this as a starting point.
To manage commits that are on the local repo only, you can use the
git reset command. There are two options to explore: --soft and --hard.
The
git reset --soft command tells Git to move HEAD back to the specified SHA. It doesn’t change the local file system, and it doesn’t change the index. I’ll admit when I read that description, it didn’t mean much to me, but looking at the example definitely helps:$ git reset --soft HEAD^
$ git status
On branch master
Changes to be committed:
(use "git reset HEAD ..." to unstage)
new file: file_i_do_not_want
$ git log --oneline
443272f feature 2
0ff80ca feature 1
3ca2262 older stuff here
In the example, we reset
HEAD to HEAD^. Remember that ^ tells Git to step back one commit. The --soft option told Git to not change the index or the local file system, so the file_i_do_not_want is still in the index in the “Changes to be committed:” state. The git logcommand shows that the bad commit was removed from the history, though.
That’s what the
--soft option does. Now let’s look at the --hard option. Let’s go back to your original state so that bad commit is in the repo again and try --hard:$ git log --oneline
2e9d704 bad commit
443272f feature 2
0ff80ca feature 1
3ca2262 older stuff here
$ git reset --hard HEAD^
HEAD is now at 443272f feature 2
$ git status
On branch master
nothing to commit, working directory clean
$ git log --oneline
443272f feature 2
0ff80ca feature 1
3ca2262 older stuff here
There are several things to notice here. First the
reset command actually gives you feedback on the --hard option where it does not on the --soft. I’m not sure of why this is, quite honestly. Also, when we do the git status and git log afterwards, you see that not only is the bad commit gone, but the changes that were in that commit have also been wiped out. The --hard option resets you completely back to the SHA you specified.
Now, if you remember the last section about changing history in Git, it’s dawned on you that doing a reset to a branch you’ve already pushed to a remote might be a bad idea. It changes the history and that can really mess up your co-workers.
Git, of course, has a solution for that. The
git revert command allows you to easily remove the changes from a given commit but does not change history. It does this by doing the inverse of the commit you specify. If you added a line to a file, git revert will remove that line from the file. It does this and automatically creates a new “revert commit” for you.
Once again, reset the repo back to the point that
bad commit is the most recent commit. First confirm what the changes are in bad commit:$ git diff HEAD^
diff --git a/file_i_do_not_want b/file_i_do_not_want
new file mode 100644
index 0000000..6fe5391
--- /dev/null
+++ b/file_i_do_not_want
@@ -0,0 +1,6 @@
+file1
+file2
+file3
+file4
+file_i_do_not_want
+growing_file
You can see that we’ve simply added the new
file_i_do_not_want to the repo. The lines below @@ -0,0 +1,6 @@ are the contents of that new file. Now, assuming that this time you’ve pushed that bad commit to master and you don’t want your co-workers to hate you, use revert to fix that mistake:$ git revert HEAD
[master 8a53ee4] Revert "bad commit"
1 file changed, 6 deletions(-)
delete mode 100644 file_i_do_not_want
When you run that command, Git will pop up an editor window allowing you to modify the commit message for the revert commit:
Revert "bad commit"

This reverts commit 1fec3f78f7aea20bf99c124e5b75f8cec319de10.

# Please enter the commit message for your changes. Lines starting
# with '#' will be ignored, and an empty message aborts the commit.
# On branch master
# Changes to be committed:
#  deleted:    file_i_do_not_want
#
Unlike
commit, git revert does not have an option for specifying the commit message on the command line. You can use -n to skip the message editing step and tell Git to simply use the default message.
After we revert the bad commit, our log shows a new commit with that message:
$ git log --oneline
8a53ee4 Revert "bad commit"
1fec3f7 bad commit
443272f feature 2
0ff80ca feature 1
3ca2262 older stuff here
The “bad commit” is still there. It needs to be there because you don’t want to change history in this case. There’s a new commit, however, which “undoes” the changes that are in that commit.
git clean
There’s another “clean up” command that I find useful, but I want to present it with a caution.
Caution: Using
git clean can wipe out files that are not committed to the repo that you will not be able to recover.git clean does what you guess it would: it cleans up your local working directory. I’ve found this quite useful when something large goes wrong and I end up with several files on my file system that I do not want.
In its simple form,
git clean simply removes files that are not “under version control.” This means that files that show up in the Untracked files section when you look at git statuswill be removed from the working tree. There is not a way to recover if you do this accidentally, as those files were not in version control.
That’s handy, but what if you want to remove all of the
pyc files created with your Python modules? Those are in your .gitignore file, so they don’t show up as Untracked and they don’t get deleted by git clean.
The
-x option tells git clean to remove untracked and ignored files, so git clean -x will take care of that problem. Almost.
Git is a little conservative with the
clean command and won’t remove untracked directories unless you tell it to do so. Python 3 likes to create __pycache__directories, and it’d be nice to clean these up, too. To solve this, you would add the -d option. git clean -xd will clean up all of the untracked and ignored files and directories.
Now, if you’ve raced ahead and tested this out, you’ve noticed that it doesn’t actually work. Remember that warning I gave at the beginning of this section? Git tries to be cautious when it comes to deleting files that you can’t recover. So, if you try the above command, you see an error message:
$ git clean -xd
fatal: clean.requireForce defaults to true and neither -i, -n, nor -f given; refusing to clean
While it’s possible to change your git config files to not require it, most people I’ve talked to simply get used to using the
-f option along with the others:$ git clean -xfd
Removing file_to_delete
Again, be warned that
git clean -xfd will remove files that you will not be able to get back, so please use this with caution!Resolving Merge Conflicts
When you’re new to Git, merge conflicts seem like a scary thing, but with a little practice and a few tricks, they can become much easier to deal with.
Let’s start with some of the tricks that can make this easier. The first one changes the format of how conflicts are shown.
diff3 Format
We’ll walk through a simple example to see what Git does by default and what options we have to make it easier. To do this, create a new file,
merge.py, that looks like this:def display():
print("Welcome to my project!")
Add and commit this file to your branch
master, and this will be your baseline commit. You’ll create branches that modify this file in different ways, and then you’ll see how to resolve the merge conflict.
You now need to create separate branches that will have conflicting changes. You’ve seen how this is done before, so I won’t describe it in detail:
$ git checkout -b mergebranch
Switched to a new branch 'mergebranch'
$ vi merge.py # edit file to change 'project' to 'program'
$ git add merge.py
$ git commit -m "change project to program"
[mergebranch a775c38] change project to program
 1 file changed, 1 insertion(+), 1 deletion(-)
$ git status
On branch mergebranch
nothing to commit, working directory clean
$ git checkout master
Switched to branch 'master'
$ vi merge.py # edit file to add 'very cool' before project
$ git add merge.py
$ git commit -m "added description of project"
[master ab41ed2] added description of project
 1 file changed, 1 insertion(+), 1 deletion(-)
$ git show-branch master mergebranch
* [master] added description of project
 ! [mergebranch] change project to program
--
*  [master] added description of project
 + [mergebranch] change project to program
*+ [master^] baseline for merging
At this point you have conflicting changes on
mergebranch and master. Using the show-branchcommand we learned in our Intro tutorial, you can see this visually on the command line:$ git show-branch master mergebranch
* [master] added description of project
! [mergebranch] change project to program
--
* [master] added description of project
+ [mergebranch] change project to program
*+ [master^] baseline for merging
You’re on branch
master, so let’s try to merge in mergebranch. Since you’ve made the changes with the intent of creating a merge conflict, lets hope that happens:$ git merge mergebranch
Auto-merging merge.py
CONFLICT (content): Merge conflict in merge.py
Automatic merge failed; fix conflicts and then commit the result.
As you expected, there’s a merge conflict. If you look at status, there’s a good deal of useful information there. Not only does it say that you’re in the middle of a merge,
You have unmerged paths, but it also shows you which files are modified, merge.py:$ git status
On branch master
You have unmerged paths.
(fix conflicts and run "git commit")
Unmerged paths:
(use "git add ..." to mark resolution)
both modified: merge.py
no changes added to commit (use "git add" and/or "git commit -a")
You have done all that work to get to the point of having a merge conflict. Now you can start learning about how to resolve it! For this first part, you’ll be working with the command line tools and your editor. After that, you’ll get fancy and look at using visual diff tools to solve the problem.
When you open
merge.py in your editor, you can see what Git produced:def display():
<<<<<<< HEAD
print("Welcome to my very cool project!")
=======
print("Welcome to my program!")
>>>>>>> mergebranch
Git uses
diff syntax from Linux to display the conflict. The top portion, between <<<<<<< HEAD and =======, are from HEAD, which in your case is master. The bottom portion, between ======= and >>>>>>> mergebranch are from, you guessed it, mergebranch.
Now, in this very simple example, it’s pretty easy to remember which changes came from where and how we should merge this, but there’s a setting you can enable which will make this easier.
The
diff3 setting modifies the output of merge conflicts to more closely approximate a three-way merge, meaning in this case that it will show you what’s in master, followed by what it looked like in the common ancestor, followed by what it looks like in mergebranch:def display():
<<<<<<< HEAD
print("Welcome to my very cool project!")
||||||| merged common ancestors
print("Welcome to my project!")
=======
print("Welcome to my program!")
>>>>>>> mergebranch
Now that you can see the starting point, “Welcome to my project!”, you can see exactly what change was made on
master and what change was made on mergebranch. This might not seem like a big deal on such a simple example, but it can make a huge difference on large conflicts, especially merges where someone else made some of the changes.
You can set this option in Git globally by issuing the following command:
$ git config --global merge.conflictstyle diff3
Okay, so you understand how to see the conflict. Let’s go through how to fix it. Start by editing the file, removing all of the markers Git added, and making the one conflicting line correct:
def display():
    print("Welcome to my very cool program!")
You then add your modified file to the index and commit your merge. This will finish the merge process and create the new node:
$ git add merge.py
$ git commit
[master a56a01e] Merge branch 'mergebranch'
$ git log --oneline
a56a01e Merge branch 'mergebranch'
ab41ed2 added description of project
a775c38 change project to program
f29b775 baseline for merging
Merge conflicts can happen while you’re cherry-picking, too. The process when you are cherry-picking is slightly different. Instead of using the
git commit command, you use the git cherry-pick --continue command. Don’t worry, Git will tell you in the status message which command you need to use. You can always go back and check that to be sure.
git mergetool
Similar to
git difftool, Git will allow you to configure a visual diff tool to deal with three-way merges. It knows about several different tools on different operating systems. You can see the list of tools it knows about on your system by using the command below. On my Linux machine, it shows the following:$ git mergetool --tool-help
'git mergetool --tool=' may be set to one of the following:
araxis
gvimdiff
gvimdiff2
gvimdiff3
meld
vimdiff
vimdiff2
vimdiff3
The following tools are valid, but not currently available:
bc
bc3
codecompare
deltawalker
diffmerge
diffuse
ecmerge
emerge
kdiff3
opendiff
p4merge
tkdiff
tortoisemerge
winmerge
xxdiff
Some of the tools listed above only work in a windowed
environment. If run in a terminal-only session, they will fail.
Also similar to
difftool, you can configure the mergetool options globally to make it easier to use:$ git config --global merge.tool meld
$ git config --global mergetool.prompt false
The final option,
mergetool.prompt, tells Git not to prompt you each time it opens a window. This might not sound annoying, but when your merge involves several files it will prompt you between each of them.Conclusion
You’ve covered a lot of ground in these tutorials, but there is so much more to Git. If you’d like to take a deeper dive into Git, I can recommend these resources:
- The free, on-line, Pro Git is a very handy reference.
- For those of you who like to read on paper, there’s a print version of Pro Git, and I found O’Reilly’s Version Control with Git to be useful when I read it.
--helpis useful for any of the subcommands you know.git diff --helpproduces almost 1000 lines of information. While portions of these are quite detailed, and some of them assume a deep knowledge of Git, reading the help for commands you use frequently can teach you new tricks on how to use them.
About Jim Anderson

Jim has been programming for a long time in a variety of languages. He has worked on embedded systems, built distributed build systems, done off-shore vendor management, and sat in many, many meetings.
» More about Jim+++++++++++++++++++++++++++++++++++++++++++++++++++++++++++++++++++++++
+++++++++++++++++++++++++++++++++++++++++++++++++++++++++++++++++++++++
+++++++++++++++++++++++++++++++++++++++++++++++++++++++++++++++++++++++
- Bloggery committed by chris tower - 1809.21 - 10:10
- Days ago = 1175 days ago
- New note - On 1807.06, I ceased daily transmission of my Hey Mom feature after three years of daily conversations. I plan to continue Hey Mom posts at least twice per week but will continue to post the days since ("Days Ago") count on my blog each day. The blog entry numbering in the title has changed to reflect total Sense of Doubt posts since I began the blog on 0705.04, which include Hey Mom posts, Daily Bowie posts, and Sense of Doubt posts. Hey Mom posts will still be numbered sequentially. New Hey Mom posts will use the same format as all the other Hey Mom posts; all other posts will feature this format seen here.
No comments:
Post a Comment