
Hey, Mom! Talking to My Mother #1072 - Getting started with AWS Lambda and Node.js
Hi Mom,
I am catching up, so I am logging more of "my study."
This post from HACKERNOON came through fairly effortlessly, though I had to re-size images and the GitHub embeds did not come through so I took screen shots and then added links for the code.
Still, like my recent BLOCKCHAIN post, this is a good post for me and other to study from. Sure, it's mostly a straight share, but I do give credit. :-)
ORIGINAL HERE =
https://hackernoon.com/getting-started-with-aws-lambda-and-node-js-4ce3259c6dfd
Getting Started with AWS Lambda and Node.js
Once upon a time, not so long ago, a word caught my ear. Lambda. That struck a chord, remembering the good old days of playing Half-Life as a kid. Little did I know what AWS Lambda was, and how incredibly awesome it is. If you’re intrigued, stick around. I’ll only take a few minutes out of your already busy day, and you surely won’t mind.
TL;DR
- Function as a Service — Defining the architecture behind AWS Lambda.
- Creating your first function — Creating a simple Lambda function throught the AWS Console.
- Writing some logic — Adding some real logic to the mix and writing a random dice roll function.
- Connecting an API — Adding an event trigger through AWS API Gateway to trigger the function.
- Uploading Code with a ZIP — Adding npm modules and uploading them as a .zip file.
- Monitoring — Short overview of monitoring tools.
Function as a Service
Let’s jump right in. The architecture AWS Lambda belongs to is called either Serverless Computing or Function as a Service. It’s groundbreaking because of the lack of servers. That sounds strange. Well the code is not running on potatoes, is it!? Okay, that’s just a saying. What’s actually going on is that you, the developer, don’t need to worry about the infrastructure your code is running on. You deploy the code into the cloud and it handles the creation of all needed resources by itself. But how? Containers!

No, not those. These!
Docker is the world’s leading software container platform. Developers use Docker to eliminate “works on my machine” problems when collaborating on code with co-workers. Operators use Docker to run and manage apps side-by-side in isolated containers to get better compute density. Enterprises use Docker to build agile software delivery pipelines to ship new features faster, more securely and with confidence for both Linux, Windows Server, and Linux-on-mainframe apps.
Every time an AWS Lambda Function is created, a container is spun up to serve it. It’s actually not a Docker container though, rather a proprietary container built by AWS. I just used the example so you would understand it a bit easier.
The code is deployed into the container and then executed. Hence making every subsequent request faster because AWS is skipping the initial creation of the container if it already exists.
Creating your first function
Before you can even see the code you need to create a new function in the AWS console. Which means you need an AWS account. If you don’t have an account, don’t hesitate to create one, they have incredible free tiers that include various services and last up to 12 months.
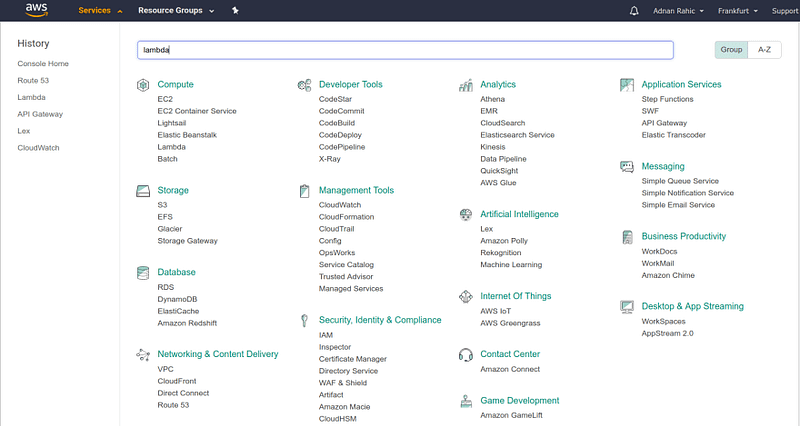
Moving on, fire up a browser and navigate to your account. From there you need to find Lambda. Press the services dropdown and select Lambda.
You’ll land on the Lambda homepage with a big orange button prompting you to create a new function. Well, don’t keep it waiting any longer, press it.

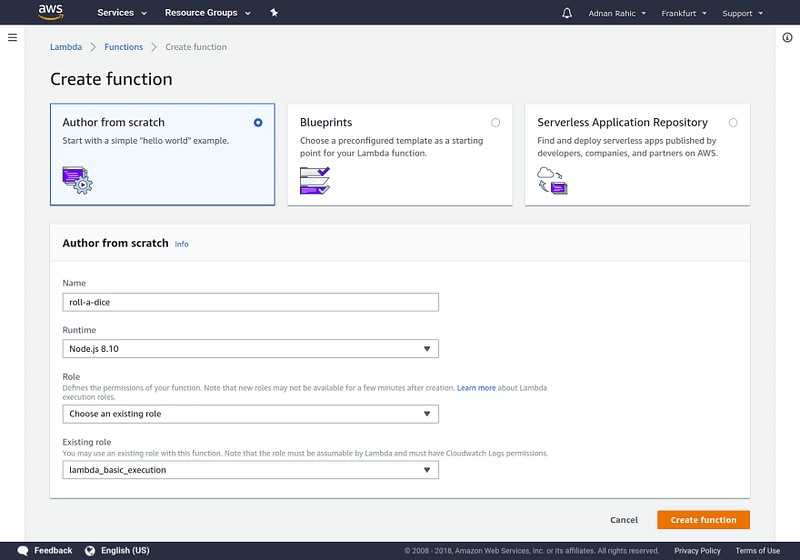
This will take you to the main function creation wizard. As this example will cover a basic function that will simulate a dice throw, let’s forget about the blueprints and just author one from scratch.
Awesome! Now you just need to add a name and role for the function and finally start writing some code. Regarding the role, feel free to just pick an existing role such as
lambda_basic_execution. It will more than suffice for this simple example.
Make sure not to forget adding Node.js 8.10 as the runtime either. Finally, go ahead and create the function.
Great! Now you’re finally seeing some code. Much better. Let’s dive in. There are several options to take into consideration. The code entry type option sets how you will add code to the function. It can either be inline, upload a .zip file, or upload from S3.
We’ll be using the first option, editing inline. For small functions, it’s totally fine to write code inline. But when you have more code, it gets very tiresome. That’s why there is a .zip upload option which we will touch upon later as well.
Set the runtime to
Node.js 8.10, which is the latest supported version of Node.js for Lambda at the time of this writing. The handler can stay the same as well. Here, the index stands for the name of the file, while handler is the name of the function.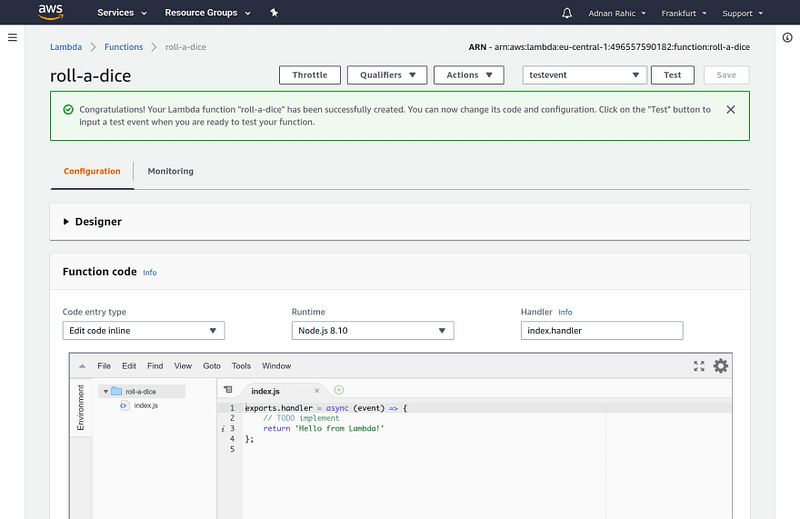
With previous versions of Node.js on AWS Lambda (6.10), there were 3 main parameters:
- The
eventparameter contains the current event info. That means the event that triggers the function will send along information to the function to use. An example would be the data an HTTP request sends along to the endpoint, such as whether it has request parameters or a body. - The
contextcontains all the information about the function itself. How long it has been running, how much memory it's consuming among other things. This is viewed as the runtime information. - The
callbackis pretty self-explanatory. When you want to tell the function to end its execution, you invoke the callback. It takes two parameters, the first is an error, the second is the data you wish to send back as the response of the Lambda function.
Things have changed with
Node.js 8.10 because of the addition of async/await support. The handler can now accept a promise value. This is why we can now assign an async function to the handler, and return a promise directly. No more stupid callback parameters. So awesome!Writing some logic
That’s enough with the set up for now. Let’s code something.
We’re starting out with this snippet of code. The goal is to write a piece of code that will mimic the roll of a dice.

Here goes nothing.

Nice! That does the trick. Now the function will return a random number between 1 and 6. With that out of the way let’s test it.
Press the orange test button and proceed to create a simple test event. Give it a funky name for no particular reason. Just for the fun of having a test event named
FunkyName. Now you can go ahead and test the function. After pressing the test button you'll see something like this.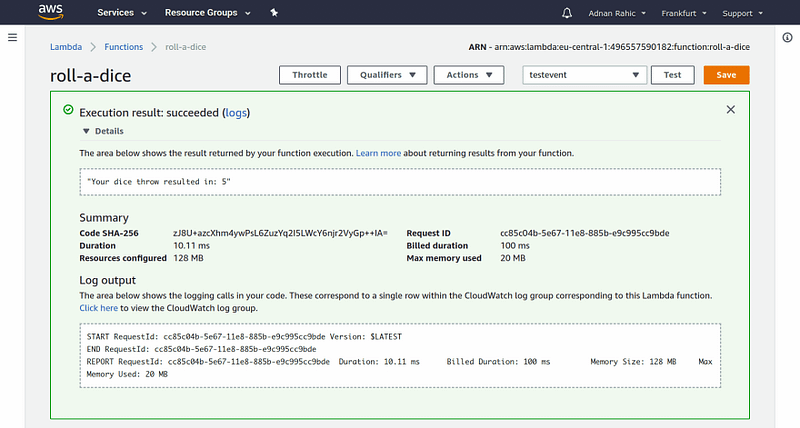
The section bordered with the dashed outline shows the function output, more precisely the return value that got sent back by the function.
That was fun! You now have a roll a dice function, but no way of triggering it outside of AWS, yet.
Connecting an API
Here comes the crucial part. How do you think a lambda function knows how to start its execution? Voodoo? Magic? No, sadly not. Every function invocation is triggered by an event. It can be an when an image gets uploaded to S3, it can be an Amazon Alexa skill, or just a regular HTTP request.
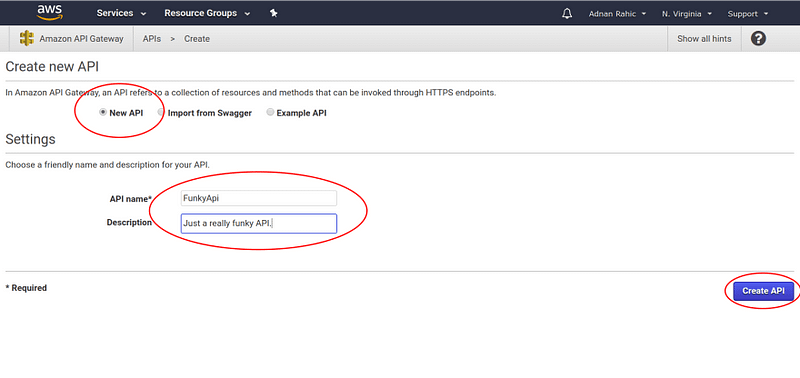
Let’s create an HTTP event and tell it to invoke our function. To be able to do this you first need to jump over to API Gateway in the AWS console. In the services dropdown pick API Gateway, and you’ll land here.

You’ll immediately be prompted to create an API. Ignore all the suggestions and just pick New API and input a name for your API. I’m going to stick with FunkyApi, it just sounds right. Go ahead and hit create.
Now comes the fun part. Finally get to hook up the API to the function. First press the Actions dropdown and pick Create method. You’ll see another smaller dropdown show up. Press it, and pick GET. Set the integration type to Lambda Function, select the region where you created the function and write the name of your function.
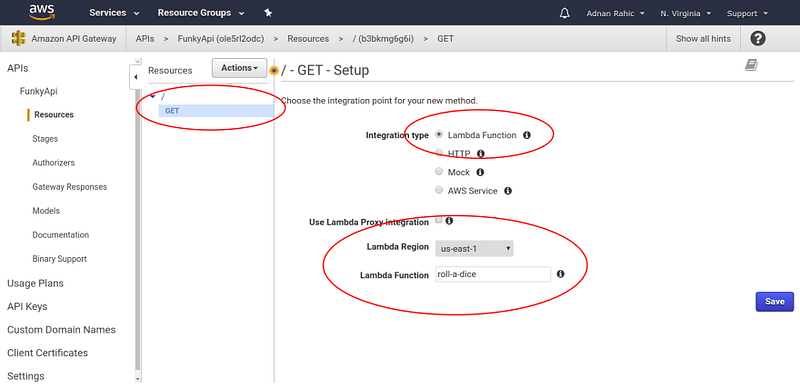
Hit save and rejoice!
The API is set up and ready. You now only need to deploy it. Press the Actionsdropdown once again and hit Deploy API. Pick a new Deployment Stage, write down dev as the stage name and you’re ready to deploy the API.
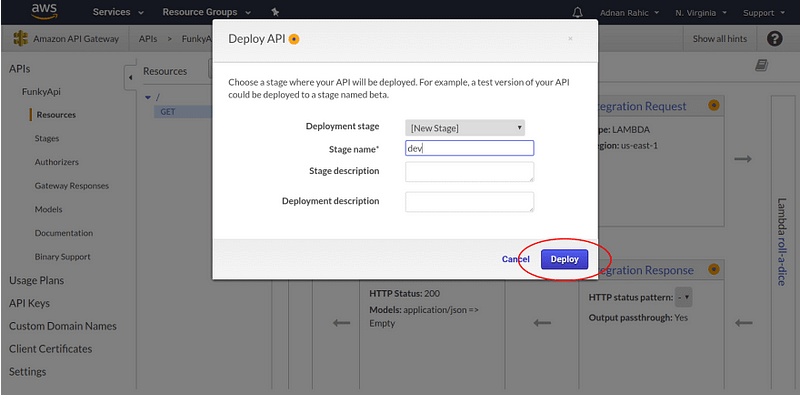
Finally! The API endpoint is ready. You now have access to the Invoke URL on the dev Stage Editor.
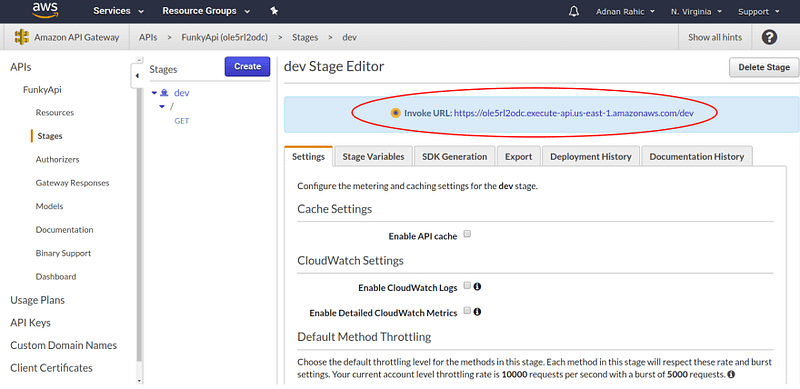
Feel free to open up the API endpoint in a browser window and check the output. What do you see? No really, what do you see? A random number between 1 and 6 should be returned back.
How awesome is this!? In less than 5 minutes you’ve created a Lambda function, connected it to API Gateway and created an endpoint to be consumed whenever you like.
Uploading Code with a ZIP
What if you need to use some modules from npm? You can’t add them inline. There has to be a way of running code with dependencies. Well, there is, but it’s a bit tricky to get right. Nevertheless, let’s get on with it!
First of all, create a directory and initialize npm.
$ mkdir roll-a-dice && npm init -y
Once you’ve done this, go ahead and install moment, a simple datetime library.
$ npm install moment --save
This will create a
node_modules folder with the required dependencies. To include them you need to compress all the files and upload the .ZIP file to Lambda.
Important Note: Only compress the files and folders inside of the project directory. Do NOT zip the whole folder. If you do it will break the configuration and the Lambda function will fail!
Before you go ahead and compress the files add some code with the new npm module you just installed to make sure the Lambda function uses it.
Create a new file in the project directory and name it
index.js. Paste the existing lambda function from AWS into the file and edit it slightly.
Save all the files and go ahead and zip them up. Remember, only the files and folders within the roll-a-dice directory.
You now have a .ZIP file. Go ahead and jump back to the AWS Console.
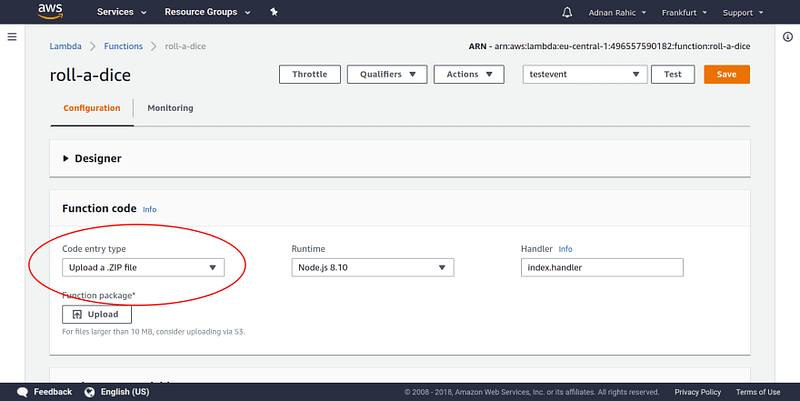
Change the Code entry type to Upload a .ZIP file and upload the file you just recently compressed. Great! Now, scroll back to the top of the page and press the big orange button once again to Save, and Test the function.
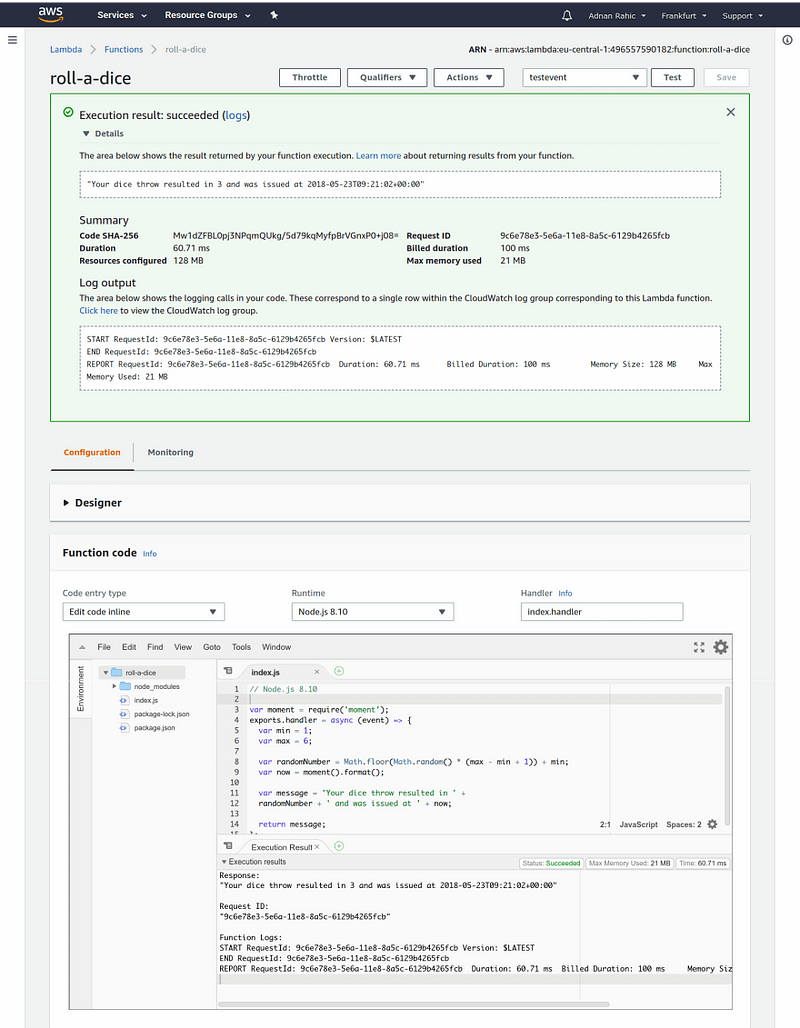
Nice! It works and it’s showing the current date and time. You zipped the function and npm module correctly. Just in case, jump back to a browser window and try the endpoint once again. It should now show the updated message.
Monitoring
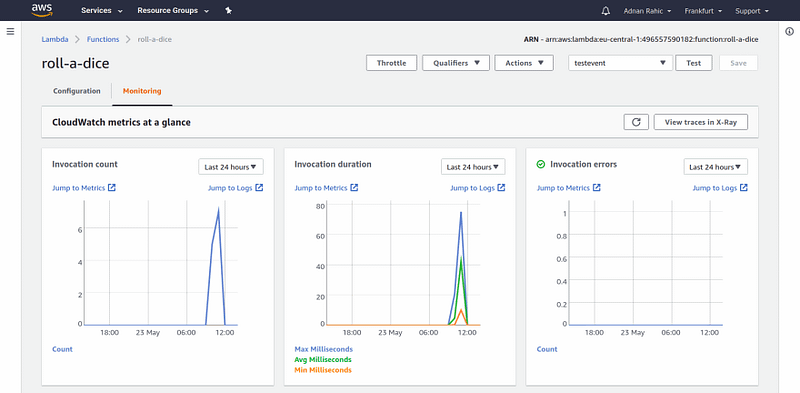
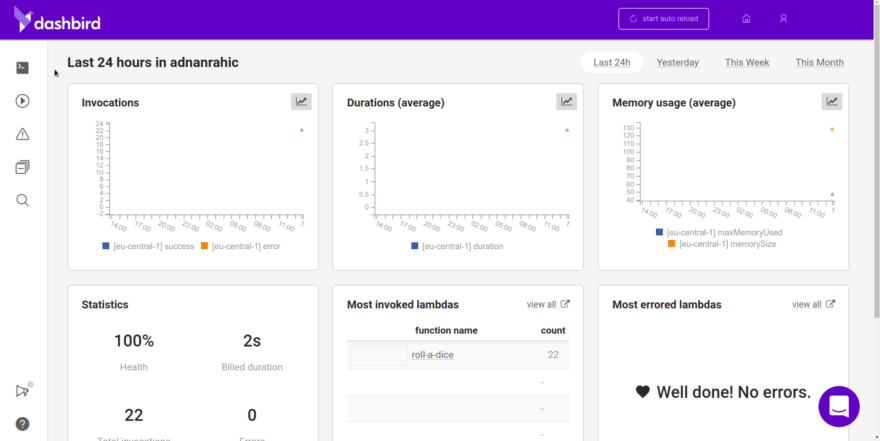
What about having insight into your function? Easy, there’s a Monitoring tab! Here you can check out metrics about your function’s behavior.
But, it can get a bit hard to have proper insight when you have multiple functions. In that case, you might want to check out an AWS Lambda monitoring reporting tool like Dashbird, IOPipe, Datadog or something similar.
Here’s an example of how Dashbird gives you a proper dashboard of your AWS Lambda Functions.
What now? Start coding!
Lambda is an incredible tool which works well with an abundance of other services on AWS. Lambda functions can be invoked in response to events like file uploads, they can also be used for chatbots, REST APIs and much, much more.
This simple API example we coded above is just the beginning. But you can see the point. So much overhead is avoided with just worrying about the code, not caring about the underlying infrastructure. I urge you to continue playing with this technology as it will only get more popular in the time to come. Just start coding. Whatever it may be, it doesn’t matter. Just start writing code, because you will learn the most by doing it yourself.
We at Dashbird want to create a more welcoming environment for creating serverless apps by making tracking errors a walk in the park. If you have any questions feel free to let me know in the comments below.
If you missed any of the steps above, here’s the repository with all the code.
To read more about serverless technologies, you can check out my profile.
+++++++++++++++++++++++++++++++++++++++++++++++++++++++++++++++++++++++
+++++++++++++++++++++++++++++++++++++++++++++++++++++++++++++++++++++++
+++++++++++++++++++++++++++++++++++++++++++++++++++++++++++++++++++++++
Reflect and connect.
Have someone give you a kiss, and tell you that I love you, Mom.
I miss you so very much, Mom.
Talk to you tomorrow, Mom.
+++++++++++++++++++++++++++++++++++++++++++++++++++++++++++++++++++++++
+++++++++++++++++++++++++++++++++++++++++++++++++++++++++++++++++++++++
+++++++++++++++++++++++++++++++++++++++++++++++++++++++++++++++++++++++
- Days ago = 1074 days ago
- Bloggery committed by chris tower - 1806.12 - 10:10
NEW (written 1708.27) NOTE on time: I am now in the same time zone as Google! So, when I post at 10:10 a.m. PDT to coincide with the time of your death, Mom, I am now actually posting late, so it's really 1:10 p.m. EDT. But I will continue to use the time stamp of 10:10 a.m. to remember the time of your death, Mom. I know this only matters to me, and to you, Mom.
No comments:
Post a Comment