 |
| https://semaphoreci.com/community/tutorials/continuous-deployment-of-a-dockerized-node-js-application-to-aws-ecs |
A Sense of Doubt blog post #1260 - How to deploy a Node.js application to AWS Lambda using Serverless
The computer studies continue. My study. Not my teaching.
If you have clicked on my blog before, you know the drill. Often these are hear as "to read" more so then "have read," though this one looks good.
Guess who just installed Node.js on both of his machines?? :-)
FROM -
https://hackernoon.com/how-to-deploy-a-node-js-application-to-aws-lambda-using-serverless-ae7e7ebe0996
How to deploy a Node.js application to AWS Lambda using Serverless
Being a developer is amazing. Writing code, solving problems and thinking of ingenious solutions for complicated algorithms is what we live for. But, the grass is not always so green on this side of the fence. Sooner or later you need to get your hands dirty and deploy the app you worked so hard on. Deployments are not always easy. To be blunt, they can be incredibly hard and time-consuming. That’s what we’ll solve in this tutorial.
TL;DR
You can follow along from the beginning or jump to the section which interests you most, and severely hurt my feelings. 😅
- Goals
- Prerequisites
- What’s AWS Lambda?
- But, how does it work?
- What will we deploy?
- How to deploy it?
- Let’s get coding!
- Ready to deploy!
- Deploying to production!
- How to gain insight into your system?
Goals
Today you’ll learn how to deploy a Node.js application to AWS Lambda with the help of the Serverless Framework.
The walkthrough will also cover a real-life scenario of deploying a production version of your application, with environment variables, proper monitoring, and, of course, easy debugging. Oh, how I love seeing nice stack traces!
Prerequisites
This tutorial will need you to have a few simple things set up already. Don’t worry, nothing special, just the basics, and I’ll link it all below for you to see, and make sure you have, before moving on.
- AWS account — AWS has 12 months of free tiers, and plenty of lifetime free tiers, so don’t worry about breaking the bank.
- Node.js and npm installed — Here’s a quick reference for making sure you have them installed.
- Serverless Framework installed — Check this out for a nice reference, and follow along steps 1–3.
- Dashbird account — This will give us the required overview to see what’s happening to our app.
Ready? Let’s go!
What’s AWS Lambda?
AWS Lambda is a pay-as-you-go serverless compute service. Meaning what now? Well, you just deploy your source code to AWS and they handle the rest. Amazing! No need to fiddle with servers, ssh connections, Linux or Vim. But, want to know what’s even better? It scales automatically and has absolutely no downtime. I’ll let that sink in…
The technical definition for AWS Lambda would be a Function as a Service. You deploy some code, it gets invoked, processes some input, and returns a value. Simple!
Hold up a sec. We need to mention a crucial fact. All lambda functions are stateless, meaning they cannot store persistent data. And, if I just said Function as a Service, how do we deploy a whole Node.js application to AWS Lambda?
But, how does it work?
When you think about it, it’s not that complicated. A single lambda function is essentially just a tiny Node.js runtime environment. You can run whatever you want in there. That’s what we’ll do, package up a Node.js app and send it off to AWS Lambda. Sneaky. 😉
What will we deploy?
To make this example as simple as possible, the code we’ll be deploying is just 7 lines long. However, it could be as large as any Node.js application you have in production, and it would all work like a charm. Intriguing…
How do we deploy it?
In comes the Serverless Framework like a horse riding a white knight! Hold up, I may have that backward. 🤔
Anyhow, this awesome framework enables us to both develop our apps locally, just like we’re used to, but also deploy it with one simple command. Hmm… tell me more.
Let’s get coding!
First thing’s first. Open up your terminal, we need to install some packages. Yay, installing stuff, love it! 😫
1. Install and configure the Serverless Framework
$ npm install -g serverless
Note: Prefix the command with
sudo if you're running this command on Linux.$ sls config credentials --provider aws --key PUBLIC_KEY --secret SECRET_KEY
Make sure to add your IAM User’s public and secret key instead of the placeholders I specified above. If you skipped this part above, here’s the official guide in the AWS docs.
2. Create the boilerplate code
Let’s create a new folder and give it a rather noteworthy name. Jump over to your terminal and run the commands below.
$ mkdir serverless-nodejs-app && cd serverless-nodejs-app
Awesome, now what’s left is to run the
create command to generate some starter code for us. This is called a serverless service.$ sls create -t aws-nodejs -n serverless-nodejs-app
Only one more step before opening a code editor.
$ npm init -y
$ npm install --save express serverless-http
That’s it! Let’s open it up in a code editor and do some real coding.
4. Coding for real
Once you open up the code editor, you’ll see three files. Ignoring the
.gitignore file, let me explain what the handler.js is first, then I'll move on to the serverless.yml. The handler will hold all your app logic, all the code. While the servereless.yml is the configuration file for the resources you'll be creating on AWS.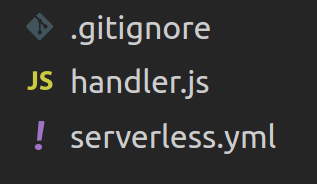
Go ahead and rename the
handler.js to app.js, just to make it simpler for us to figure out what goes where.
Delete all the starter code and paste this code snippet into the
app.js file.// app.js const express = require('express')
const sls = require('serverless-http')
const app = express()
app.get('/', async (req, res, next) => {
res.status(200).send('Hello World!')
})
module.exports.server = sls(app)
Seven lines of code 😎. Looks familiar right? Just like you’re used to. That’s it. Believe it or not, there’s nothing more to it. Let’s move on to the
serverless.yml.
Once again, delete all the boilerplate code and paste this in.
# serverless.yml service: serverless-nodejs-app provider:
name: aws
runtime: nodejs8.10
stage: dev
region: eu-central-1
functions:
app:
handler: app.server # reference the file and exported method
events: # events trigger lambda functions
- http: # this is an API Gateway HTTP event trigger
path: /
method: ANY
cors: true
- http: # all routes get proxied to the Express router
path: /{proxy+}
method: ANY
cors: true
Done! All that’s left is to deploy it.
Ready to deploy!
Switch back to the terminal window. By running one simple command your app will be deployed.
The Serverless Framework will now wrap everything up into a nice bundle, create a CloudFormation file from the
serverless.yml and shoot it off to AWS S3. Once the resources are created and the code is deployed, you'll see an endpoint get sent back to you in the terminal.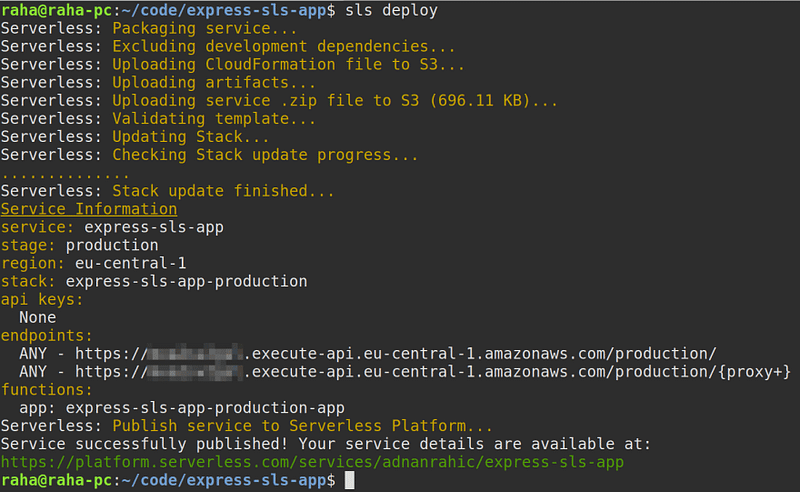
Opening up the provided URL in a browser you’ll see
Hello World! get sent back to you.Deploying to production!
This is great and all, but not really ready for a production environment… yet. Worry not! You’ll be surprised how simple it is to make it production ready.
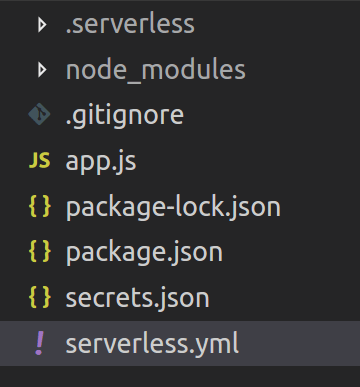
1. Add a secrets.json file to keep environment variables
For now, let’s just add the
NODE_ENV in the secrets.json.{
"NODE_ENV": "production"
}2. Add a reference for the secrets.json in the serverless.yml
As simple as it was to add the secrets file, it’s even easier to just reference the file in the
serverless.yml.service: serverless-nodejs-app custom: # add these two lines
secrets: ${file(secrets.json)} # reference the secrets.json fileprovider:
name: aws
runtime: nodejs8.10
stage: production # make sure to change this to production
region: eu-central-1
environment: # add environment property
NODE_ENV: ${self:custom.secrets.NODE_ENV}
# reference the NODE_ENV from the secrets.json file functions:
app:
handler: app.server
events:
- http:
path: /
method: ANY
cors: true
- http:
path: /{proxy+}
method: ANY
cors: true
Amazing, that’s it! Delete the
node_modules and .serverless folders from the service and run npm install once again, but this time with the --production flag.$ npm install --production
Great! All that’s left is to re-deploy the service and you’re set.
$ sls deploy
And this is what we end up with.
I guess we’re done? Not really. Having an app running in production just because you installed npm modules with
--production doesn't really cut it. To be able to sleep well at night, I need a bit more. Here's where proper system insight and monitoring tools come to play. Let me show you.How to gain insight into your system?
The #1 problem with all serverless applications are their distributed nature. Plain and simple, it’s impossibly hard to have an overview of all the things going on. Not to mention how hard it is to debug when something goes wrong.
To calm my fears I use Dashbird. It’s a simple monitoring tool that doesn’t require me to change any code and has absolutely no overhead. So, no performance-hits either. Nice!
Thankfully, they have sensible documentation, which makes the onboarding process a breeze. Go ahead and follow their Quick Start guide. Don’t forget to come back here though. 😄
Once you’re done, all the requests will start piling in one by one and you should see something like this.
Wrapping up
This was fun!
Lambda is awesome! When combined with HTTP event triggers such as API Gateway, development tools like the Serverless Framework and observability tools such as Dashbird, things just become so easy.
This simple API example we coded above is just a proof of concept. But you can see the point. It gives you a starting point from where you can create awesome production apps!
If you missed any of the steps above, here’s the repository with all the code, or join my newsletter, to stay up to date!
You can also take a look at a few of my other articles regarding serverless:
- Getting started with AWS Lambda and Node.js
- A crash course on securing Serverless APIs with JSON web tokens
- Migrating your Node.js REST API to Serverless
- Building a Serverless REST API with Node.js and MongoDB
- A crash course on Serverless with Node.js
Hope you guys and girls enjoyed reading this as much as I enjoyed writing it.
Do you think this tutorial will be of help to someone? Do not hesitate to share. If you liked it, smash the clap below so other people will see this here on Medium.
Do you think this tutorial will be of help to someone? Do not hesitate to share. If you liked it, smash the clap below so other people will see this here on Medium.
Originally published at dev.to.
Adnan Rahić
Dev/Advocate at dashbird.io. Co-Founder at bookvar.co. Author of "Serverless JavaScript by Example" - bit.ly/sls-js. Local leader at freeCodeCamp Sarajevo.
+++++++++++++++++++++++++++++++++++++++++++++++++++++++++++++++++++++++
+++++++++++++++++++++++++++++++++++++++++++++++++++++++++++++++++++++++
+++++++++++++++++++++++++++++++++++++++++++++++++++++++++++++++++++++++
- Bloggery committed by chris tower - 1808.03 - 10:10
- Days ago = 1126 days ago
- New note - On 1807.06, I ceased daily transmission of my Hey Mom feature after three years of daily conversations. I plan to continue Hey Mom posts at least twice per week but will continue to post the days since ("Days Ago") count on my blog each day. The blog entry numbering in the title has changed to reflect total Sense of Doubt posts since I began the blog on 0705.04, which include Hey Mom posts, Daily Bowie posts, and Sense of Doubt posts. Hey Mom posts will still be numbered sequentially. New Hey Mom posts will use the same format as all the other Hey Mom posts; all other posts will feature this format seen here.
No comments:
Post a Comment